Brave Bishop
I recently finished one of the cleanest games of chess I've ever orchestrated, including what I think is a pretty cool bishop maneuver. I will be getting on to flogging myself over losses soon enough, but first, something to smile about.
The game started out as an awkward Sicilian,
1. e4 c5 2. Bc4!?This is supposed to be one of white's worst choices here. In fact, it's not even covered in my book on the Sicilian that covers 5 other "rare second moves". Instead of playing a solid refutation (2. ... e6) I just continued with normal accelerated dragon moves.
2. ... Nf6 3. c3I don't know if this is some kind of delayed Alapin or what but I decide I should be trying to play d5 so
4. ... e6 5. f4?! d5.
White is playing a mix of early Bc4, Alapin, and Grand Prix which seems uncoordinated to me. c3 is supposed to support a d4 push, which doesn't go well with f4 because it leaves a big hole on e4. I have the feeling black has already equalized.
6. exd5 exd5 7. Qe2+White gets a check in:
Black to move

White's pawn structure isn't good for development
6. ... Be7 7. Bb5 Nf6Black just develops his pieces. It's easier to know where to put the knight than the c8 bishop.
8. Nf3 0-0 9. Bxc6 bxc6 10. 0-0This is a critical position
Black to move

White might get away with playing d3, Be3, and Nbd2 and his position might not suck. This would be bad, we would like black's position to suffer more than if we simply allow these moves. A natural move here is just Bg4 because it feels nice to develop a piece with a pin, but this doesn't really do anything and perhaps the bishop might be better going to a6.
Instead, black finds a move that accomplishes two things.
10. ... c4!The exclam might be excessive, but lets see what we've got. First, we're holding back white's easy development since it's not as simple to move the d-pawn any more. Second, we're clearing the c5 square for our dark squared bishop that was in danger of not getting active. We do cut off the a6-f1 diagonal from our light squared bishop, but that bishop can have scope on the other side of the board (f5, g4).
11. d4This sticks black with a decision. There is only one chance to capture this pawn. There is some temptation to leave the pawns on f4 and d4 when white has a bad bishop. But the closed position doesn't bode well for black's bishop pair. Black would prefer to open up the vulnerable a7-g1 diagonal.
11. ... cxd3ep 12. Qxd3If you can see all the tactics from this position, give yourself a gold star
Black to move

Black needs to strike while the iron is hot. White is threatening to just play Be3 and Nbd2. It's still not the prettiest position for white, but it seems to hold together.
12. ... Qb6+Better than Bc5+ which can be met by Be3 or Kh1. Now Be3 hangs the b-pawn and there may be even worse consequences if 13. Be3 Ba6! Thankfully black doesn't have to calculate that line unless black actually makes the mistake Be3 and then it's just a matter of choosing the winning line he's more sure of. Kh1 loses material to Ba6.
13. Qe3 Bc5 14. Nd4 Re8White's moves are pretty much forced. After loading up on the weak diagonal, black goes to work on the open file and the exposed queen. Black doesn't want to lose a pawn on d4 so:
15. Qd2 Ne4 A great post of the knight with tempo.
16. Qd1Black to move

Black's pieces have gone forward while white's have not. Black can be proud of his better placed pieces, but this is not the moment to let up. Black might be tempted to play Ba6 to develop with tempo, but there is a better option for this brave bishop in this position. The c8 bishop enters the game in the most forceful way
16. ... Bg4!!This move is brought to you by the letter "f" and the number "2". This hint is probably enough to figure out why 17. Qxg4? is an immediate loser. So once again white is making an unhappy move with his queen instead of developing his pieces. White still doesn't want to hang a pawn on d4 and so chooses:
17. Qd3 And now black demonstrates why the previous move gets two exclams
17. ... Be2! This move forks the queen and rook, so black will certainly pick up material if white declines the bishop a second time, so how does black pull it out when the bishop is accepted?
18. Qxe2 Nxc3White to move

This move simultaneously captures a pawn, attacks the queen, and removes a defender of the d4 knight. If white tries to save the queen, black will recoup the sacrificed piece by taking the knight on d4 with check and still retain the extra pawn he's just captured on c3. Black does need to be certain that white can't get too much material for the queen. For example, 19. Nxc3 Rxe2 20. Nxe2 puts the material at a rook and two pieces for a queen and pawn, but the position is not yet quiescent and black regains one of the pieces with 20. ... Bxd4. In the game, white tried:
19. Qxe8 Rxe8 20. Nxc3Trying to protect the d4 knight with 20. bxc3 loses more material to 20. ... Bxd4+ 21. cxd4 Qxd4+ 22. Kh1 Qxa1 picking up the rook.
20. ... Bxd4+ and white has a Queen and pawn for Rook and knight, a winning material advantage.
The rest of the game is more technical in converting the advantage.
21. Kh1 Bxc3 22. bxc3 Re2 White has no real development and black is invading on the 7th
White to move
 23. Ba3 Qa6
This is an interesting move. White has to be prepared to meet Re1. In the game I decided I was willing to give back material in order to reach a winning King and Pawn endgame.
24. Rae1 Rxe1 25. Rxe1 Qxa3 26 Re8+ Qf8 White resigns.Maybe a bit early, but black retains the extra pawn going into the King and Pawn ending. This ending is not difficult to play.
Labels: diagrams, full game, tactics
Bishop and Rook Pawn
Lately I have been playing a lot of games at chess.com and not blogging about it. I have a couple of neat things from those games to put down in the blog before I do some deeper annotations.
First, a quick reminder of bishop and rook pawn endgame:
A draw

White has no way to pry the black king away from h8 and so the game is drawn.
So in a recent game when I won a bishop for some pawns and reached this position:

I was concerned that even if I can use my extra piece to win black's pawns I'm only headed for a draw. Of course, the rooks make a big difference. The e and g pawns fell without significant resistance (
38. h4 Rc2+ 39. Kd1 Rff2 40. Rf7+ Ke5 41. Rfe7+ Kd4 42. Rxe5+ Kc5 43. Be8 Rb2 44. Kc1 Rbc2+ 45. Kb1 Rb2+ 46. Ka1 Rbd2 47. Ra5+ Kb6 48. Rb5+ Kc7 49. Rc4+ Kd8 50. Bxg6 Rd1+ 51. Bb1) and we reached this position:

Black is still heading towards the draw shown in the first diagram. While the rooks are still on, white needs to accomplish one of two goals. Either win black's h-pawn and push his own while the king can be cut off from the h-file by a rook or banish black's king to the far end of the queenside. In the game, white managed to accomplish the second of these goals,
51. ... Ke7 52. Rb7+ Ke6 53. Rh7 Rf7 54. Rc2 Re1 55. Kb2 Ref1 56. Re2+ Kd5 57. Ba2+ Kc7 58. Rc7+ Kb6 59. Rc8 R1f4 60. Re3 Rb4+ 61. Rb3 Rxb3+ 62. Bxb3 Kb7 63. Rc3 Rf2+
Here white has an important decision. Is it okay to play Rc2 and allow the rooks to be traded? It turns out that the plan of driving the black king to the queenside has worked in this position. If the rooks are traded on c2, the white king is closer to the h8 square that the black king thanks to the white bishop covering some key squares. The game continued
64. Rc2 Rxc2+ 65. Kxc2 Kc7 66. Kd3 Kd7 67. Ke4 Ke7 68. Kf5 And now thanks to the bishop black can't follow along with Kf7 and black resigned a few moves later. When calculating the ending after 65. Kxc2, be sure to consider black's attempt to cut off the bishop with 65. ... Kc6 and 66. ... d5.
Labels: diagrams, endgame
My blunders
Here are some recent blunders to keep anybody from thinking I'm good at chess.
This is a position from the Sicilian Accelerated Dragon.


I think black was doing quite well until playing f6? Black was threatening a fork with d4, prevented only by the fact the pawn is pinned to the rook. I considered Rb8 breaking the pin and threatening the b2 pawn, but didn't see how to proceed after Na4, which brings a second attacker to the c5 pawn. I don't like responding with d4 because this opens the diagonal his light squared bishop is on and puts a pawn on the diagonal of my dark squared bishop. Maybe that's over thinking it since the Knight on a4 is not well placed in this line.
f6 is a thematic move in this line as it tries to break down the diagonal of the g7 bishop. I thought if I got a little more play on that diagonal before Rb8, then Rb8 would be an even more powerful move. Unfortunately f6 is a blunder. Bxd5! and white picks up plenty of material.
Here is an example where I am overzealous about attacking and forget my defensive responsibilities.

I was so focused on the lonely d5 pawn and the slightly exposed king that I figured it was good to pressure black with Bc3. Oops, the knight on d3 is hanging.
Labels: blunders, diagrams, tactics
Tactical melee
A recently finished game on chess.com was a real tactical melee for much of the game. Here is a position with the final tactical mistake:
White to move

Black has just moved Ncd4. On the face of it, the knights look like they are charging into white's position and positionally, black seems to be doing well. In reality this move just blew black's position and he is simply lost at this point. The whole game, including the winning continutation from this point can be seen at
chess.com.Labels: diagrams, full game, tactics
My first correspondence games
I have started playing some correspondence chess on
chess.com. Before I was able to get some good opponents I had to raise my rating. Those games were fun, but not terribly instructive. I also now have some more serious games to annotate, some of which are in line with my assessment that I am trying to force the tactics too much.
Here is a sample position from a fun game:
Black to move

White has just played
10. Na4? Of course, the obvious fork Qh4+ comes to mind (if Ke2 Bxg1 before taking the knight still wins a piece). In a blitz game, I'd probably snap the piece off without a second thought, but in a correspondence game, why not take time to analyze
10. ... Qh4+ 11. Ke2 Qf2+! 12. Kd3 Black has passed on the opportunity to take the piece in favor of pushing the king to open space. So black needs to find the right continuation here before playing move 11. Checks are always tempting, but correct here is
12. ... Rc8 putting the king in a box where the threat is Ne5#. White does not have an adequate way to deal with the threat, for example 13. f4 Bxf4 14. Nf3 Qe3# (14. Qe2 Ne5+ 15. Qxe5 Qxc2+ 16. Kd4 Qc4#). My opponent tried
13. c4 Rxc4, which is also ineffective.
Labels: diagrams, tactics
CT-Art 767 narrative
Some problems in level 40 of CT-Art are too complex for me to learn through repetition. For these problems, I will do what I learned from Temposchlucker and and BlueDevilKnight (are there others that did this that I am forgetting?), I will write narratives for these problems.
CT-Art 767:
White to move

The weakest points in black's position are g7 and h7. It would take many moves to get to h7 and if black plays h6, there's probably no route in. So g7 is where to focus the attack.
The immediate attempt to crash through, 1. Nxg7 Bxg7 2. Bh6 f6 allows black to defend g7 laterally with the queen. We would like to do 2 things better. The first is do not allow the lateral defense with the queen. Secondly, don't give up the knight for the bishop since the knight is a good attacker of g7.
There is a safe check that will allow Rxf6, so we examine
1. Nh6+. The king must move to f8 or h8. On 1. ... Kf8 we have 2. Bc5+ Re7 and now the pinned rook will lose for black after 3. Rxf6 gxh6 (gxf6 Qg8#). The critical line is
1. ... Kh8 2. Rxf6 gxf6 3. Qh4. The queen attacks the newly weakened f6 square.
Black to move
 3. ... Qe7
 Black must defend f6 (3. ... Re6 4. Rxd8 Qxd8 5. Nxf7+ loses quickly). White attacks this defender and the weak g7 square
4. Nf5 Qe6 5. Qh6.
Black to move

Black cannot defend the g7 square. 5. ... Rg8 6. Rxd8
Labels: diagrams, narrative, tactics
CT-Art 765 Narrative
I'm once again delving into the narrative writing, and I've once again found an error in CT-Art in the problem set.
CT-Art 765:
White to move

White is attacking the king, but should be wary that his own king position is not perfect, the rook on f3 is pinned and the knight on c3 is attacked. At the moment, g7 and h7 are weak near black's king. The queen attacks at h7 adding a second attacker with g6 or Rh3 is not currently possible because these pieces are pinned. The bishop attacks g7, an attacker can be added with f6 and Qh6.
The immediate f6 suffers from the fact that opening the g-file gives some play to black. 1. f6 gxf6 2. gxf6 Rg8+ 3. Kh1 Qxf3+ 4. Rxf3 Bxf3#.
In order to play g6, white can sacrifice a bishop with
1. Bxg7 Kxg7 2. Qh6 Kh8 3. g6 fxg6 4. fxg6 White is threatening mate and CT-Art gives a poor defense for black, 4. ... Qc5+ 5. R1f2 Qg5+ forcing a trade of the queens, but giving up a defender of the f8 rook, 6. Qxg5 Bxg5 7. Rxf8. Instead, black can give up material temporarily with
White to move
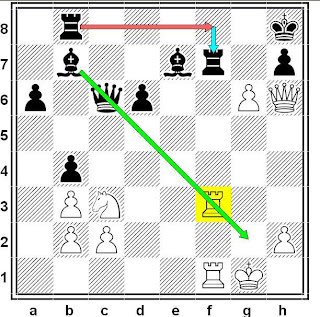 4. ... Rf7 5.gxf7 Rf8
 where black is getting his material back due to the pinned rook on f3. The idea is that if black wants to survive, he needs to keep his counterplay active, not trade queens.
If white wants real chances he needs to keep the lines to his king closed. A much simpler practical choice is
1. Qh5 with 2. g6 coming. 1. Qh5 bxc3 2. g6 and now even ... h6 fails to Qxh6, so black doesn't have time to take the knight on c3.
1. Qh5 f6 2. g6 h6 and now white sacs his bishop on h6,
3. Be3 with Bxh6 coming. In this way, white attacks the king position without opening dangerous lines to his own king.
Black to move

White attacks the black king, threatening Bxh6 without opening lines of attack for black.
Labels: CT-Art errors, diagrams, narrative, tactics
CT-Art 735
I was going to write a narrative on CT-Art 735 and decided to double check it on Fritz. It turns out the CT-Art solution has mistakes in multiple places.
CT-Art 735:
White to Move

The pawn on f7 is weak (only defended by king) and is the only defender of e6. In this kind of position, 1. Nxf7 Kxf7 2. Qxe6 immediately comes to mind as so many squares around the king can be controlled. 2. ... Kf8 is mated immediately by Bh6 so 2. ... Kg7 is forced. We can stay with forcing moves by 3. Bh6 Kh8 and now simply pry open the h-file with 4. Bxg6 where black loses quickly if 4. ... hxg6 5. Bf8+ Nh7 6. Rxh7+ Kxh7 7. Qf7+ Kh8 8. Qg7# (5. ... Nh5+ 6. Rxh5+ gxh5 7. Qh6+ Kg8 8. Qg7#). Other 4th moves for black give back excess material, e.g. 4. ... Rg8 5. Bf7.
The above is not the CT-Art solution. CT-Art starts off with 1. Nxf7 Kxf7 but then CT-Art gives 2. Rxh7. This is a good invading move, rooks are typically very well placed on the 7th rank:
Black to Move

The rook is immune from the knight, Nxh7 Qxe6 Kg7 Qxg6+ and mate follows with Bh6 or Qxh7. So black continues with 2. ... Kf8. Here CT-Art gives no credit for the very strong 3. Bxg6 instead favoring 3. Rh6 Bf8 (other moves may be better) 4. Rxg6 and then a serious error from the defense 4. ... Bg7? (Kh8 is more complex and doesn't lose nearly so quickly) which allows 5. Bh6 Nf4 6. Rxg7+ Qxg7 7. Bxf4 where white has three pawns for the exchange.
The CT-Art solution, while winning, is very complex compared to the first solution I gave. Even then, the solution given is helped along by inferior moves from the defense. A proper defense would have made this solution extremely difficult in practice.
Labels: CT-Art errors, diagrams, tactics
Writing some narratives
So far I'm doing well on level 40, but there are some problems where I'm just drawn to the wrong solution every time. So I'm taking a page out of the BDK and Temposchlucker play books and I'm going to write some narratives about these positions.
CT-Art 734:
White to Move

In this position there are two possible squares for white to invade with a knight, f6 and f5. The defenders of these squares are removed by
1. Rxh5 gxh5 and then either
a) Nd5 followed by Nf5 or
b) Nf5 followed by Nd5 and Nf6.
I'm always attracted to option (a), which is not correct. It appears correct because 2. Nd5 exd5 3. Nf5 attacks the queen and the queen cannot defend the mate on g7. However, this idea overlooks 3. ... Be3+ followed by Qxg5 (or Qe6 if Nxe3).
Option (b) is a winner because the bishop check on e3 doesn't interfere with the knight on f6 or the attack on h7. The queen is also unable to defend h7. So,
2. Nf5 exf5 3. Nd5 Be3+ 4. Kb1! Qxg5 5. Nf6+ Qxf6 6. Qxf6One of the bottom lines is that h7 is weaker than g7 due to black's ability to get the queen to g5. This makes f6 the right square for a knight rather than f5.
I've got a few more of these to write...
Labels: diagrams, narrative, tactics
Adventures in Coffeehouse Chess
I have a decent memory from my trip to the coffeehouse. I think the tactics I found today are a decent representation of the kinds of things I can find much better now than I could 6 months ago.
Black to Move

Due to a mating net on the back rank with Bf3, black picks up two pieces for his rook with 1. ... Rxf4 where 2. Bxf4 Bxf4 3. gxf4 is met by Bf3 and mate next. The game continued 2. Rxd6 Rh1+ 3. Ke2 Bf3+ and white resigned in view of Rxd1+.
Black to Move

(hopefully it's clear that the labels (a-h,1-8) on this diagram are backwards. oops!)
Material is unbalanced with black having two minor pieces for a rook. Black's long range plan should be to increase the activity of his two minor pieces. It turns out the unfortunate placement of white's pieces makes these positional ideas moot.
1. ... Qf6! and there's nowhere to run with the rook on a1 hanging in the backround. Protection doesn't help either, for example 2. Qf2 Re2 3. Qxe2 Qxd4+ also picking up the rook on a1. The game continued
2. Qf4 Re4 Fritz says Ne6 is better, but Re4 is so beautiful, it's why we play chess.
White to Move

Once again, just a lucky unfortunate placement of the pieces. The knight on b6 has had it's squares taken away by the queen and bishop trying to line up on h3. The placement of the queen is also important for finishing off the combo. The game continued 1. c5 Na4 2. c6 Bxc6 3. Nxc6 Nxc3 4. Nxe7+ Black resigned.
White to Move

In this position I engaged in dangerous pawn hunting on the queenside. My opponent has made inroads in my king position, but missed a chance to finish me off, instead going for a tactic that was refutable. There are dual threats of Nxa1 and Bd4+. White comes roaring back with
1. Qb8+ Bf8 2. Bh6 Qc5+ 3. Kg2 Qc6 4. Kh3 Qd7 5. Bxf8 f4+ 6. g4 Rxf8 7. Nxf6+ and black resigned since Kg7 Qxf8+ Kxf8 Nxd7+ leaves white a full rook ahead.
Labels: coffeehouse, diagrams, tactics
Coffeehouse nuggets
I have a few nuggets that I remember from today's trip to the coffeehouse.
The first position arises from a French defense. I don't usually play 1. e4, but decided what the heck, I'll play it today. I thought we were in an interminable positional struggle where my opponent had a bad bishop and couldn't really break my position. I have good knights, but I don't really see what targets they can hit.
White to move

The knight on f4 holds my kingside and influences the center. I'm planning to play on the c-file and try to get my other knight to d6 or c5, though I'm not even sure what my targets are from there. All that becomes moot when my opponent drops Rhd8 in my lap.
In the next example, I think I was very close to getting run over in an opposite side castling game. I caught a break when my opponent overlooked my only tactical chance.
Black to move

(I just realized, the king should be on c8, not b8 -- will fix the diagram later)
This one obviously takes some deeper calculation, but I've been thinking about the first move of this combination for most of the game so a lot of the lines seemed to come naturally. For a
Temposchlucker plan beta hint -- the first invasion square is f2, the second invasion square is h3.
The game continued 1. ... Ng4+ 2. Kg1 Bxf2+ 3. Kh1 h4 4. Be3 hxg3 5. b5 Qh5 6. Bxf2 Nxf2+ 6. Rxf2 Rxf2 7. Nxd6+ Kd7 8. Nxb7 Rxg2 9. bxc6+ Ke7 10. Qa3+Ke8 11. Kxg2 Qxh3+ 12. Kf3 Qf5+ White resigns.
I believe there are improvements for both sides in that line, but I don't think there is a refutation of black's play. It's a real exercise to calculate all the possibilities and I certainly didn't do that over the board.
Ct-Art update, 94% on level 30. 178 problems done out of 221. Looks like I'm going to have a huge improvement on 86% three times in a row.
Update: Finished level 30, rep 4 today. 92%! Ok, I slipped up a bit at the end, but it's still a big deal to do this much better. I'll go back and review the last 20-30 problems of the level before I move on to level 40.
Labels: coffeehouse, diagrams, progress report, tactics
Overseen
Here is a position overseen at the coffeehouse. The tactics in it were overlooked by the players. Ok, the position here is subject to my memory, but the basic tactic is there.
Black to move

Here black didn't quite find the winning idea
Be6 Ng5 Re1+ Kh2 Bd6 pinning the rook. (sideline: Be6 Rc4 Re1+ Kh2 Bg1+ Kg3 Bxf7)
Thanks to everyone who has encouraged me in my tactics training. I'm about halfway through level 30 at 95%. Knock on wood, but I think I'll beat my old 86% score for this level.
Labels: coffeehouse, diagrams, tactics
A swindle and another BOOC ending
I had some interesting positions from the coffeehouse this week.
Here is one from a game I was losing. It was a complicated middle game where we both had chances. My opponent sacked the exchange and got a couple pawns for it. We pick up a position where I'm barely hanging on, trying to harrass my opponents two minor pieces to keep him from making progress. Then I spot a swindle:
Black to move

After
Rg7+, black blunders with
Kh4?. Checkmate follows in two moves.
I also wound up in another bishops of opposite color endgame. I believe this is not just a simple draw because of the presence of the rooks. Here is one interesting point.
Black to move
 There must be something I am mis-remembering about this position since Ra8 just hangs the rook to Bxa8 -- For now I imagine the rook might have been on b6.
The white king is approaching black's passed pawns. Black wants to keep the king away and at the same time try to penetrate and attack white's kingside pawns. Unfortunately, the rook is tied down to the defense of the b-pawn. Since b4 allows Kc4, black has to find
Ra8! where the response Rxb5 is met by Ra3+ Ke2 (Ke4 Re3#) Ra2+ Kf1 Rf2+ followed by taking the bishop or a discovered check to win the rook.
We pick up the game a little later. Black was able to bring the rook around and win the a2 pawn. Now black threatens the b3 pawn. White has found a way to defend it twice.
Black to move

Here I chose a simplifying sacrifice.
Bxg3+ Rxg3 Rxg3 Kxg3 b3 and white doesn't have the resources to stop so many pawns. Notice that even the h and f pawns protect each other with a classic trick of two pawns separated by one file against a king. If Kh4 f4 then white can't play Kxh5 because the f-pawn will promote. So the bishop is tied to the b-pawn promotion square and the king is tied to the h-pawn which it cannot attack. The black king is free to do whatever black likes, take the e-pawn, help support the c and b pawns or the e and f pawns.
Labels: booc, coffeehouse, diagrams, endgame, swindle, tactics
My loss to the Budapest
One of my games at the coffeehouse last weekend was against the Budapest. This is a gambit for black that starts
1. d4 Nf6 2. c4 e5 3. dxe5 Ng4. I don't like letting black have all the initiative, so I play a line that gives the pawn back. I have a feeling I'll be seeing the Budapest on a regular basis from this opponent, so if anyone has comments on any line of the Budapest, I'd be happy to hear it.
I posted the whole game at
chesslog. I'll say a little more about two positions here.
After the opening moves,
4. Bf4 Nc6 5. Nf3 Bb4+ 6. Nbd2 Qe7 7. a3 Ngxe5 8. Nxe5 Nxe5 9. e3 Bxd2+ 10. Qxd2 O-O 11. Be2 d6 12. O-O b6White to move

Black has just played b6, no doubt to put his bishop on the long diagonal. I tried for a while to calculate something that would take advantage of the open diagonal before the bishop develops. The immediate Qd5 is met by c6. Bxe5 Qxe5 Bf3 doesn't get anywhere after Rb8.
Instead I settled on trying for a kind of minority attack. If I can break down the queenside pawns, black will be saddled with a weak, attackable structure. The game continued
13. b4 Bb7 14. Rab1 Rad8 15. Qc3 Qf6 16. Bxe5 dxe5 17. c5 h5 18. b5White to move

I'm keeping with my plan of breaking down the queenside pawns. Unfortunately, I've underestimated the attacking that's coming on my king. I also misplay the defense pretty badly.
18. ... bxc5 19. Qxc5 Qg6 Black lets his third pawn hang without protection, it's as if my plans are working. Until,
20. f3 Rd2 21. Qc4?? This should have been immediately punished by Bd5. Black still won with
21. ... e4 22. f4 Bd5 23. Qc5 Rxe2 24. g3 Be6 25. f5 Qg5 0-1It's important to take care of your house before you steal from your neighbors garden.
Labels: coffeehouse, diagrams, full game, tactics
Two endgames
I have a couple of endgame positions from recent games at the local coffeehouse. There is no doubt the importance of the endgame. It's also true that the endgame is so rich, you'll never run out of interesting things to study there. Exhibit A is
likesforests who has had numerous very good blog posts on the endgame.
Position 1, a win with bishops of opposite colors!
White to move

This game could easily have been drawn until Black made two mistakes to lose it. The first, is losing a pawn of f6 so that white's f-pawn is now a passed pawn. The second is becoming too aggressive with the king. If the king were back to stop the f-pawn, the game would still be drawn. Now white wins with Be5 and f5. Black must play Bc3 to stop the pawn allowing white to take on e4 and support the f-pawn with the king, eventually winning black's bishop and g-pawn.
The second position is a king and pawn endgame that features a combination of interesting techniques.
White to move

White has to be able to envision that this position is winning (or at least drawn) before entering into it. Black has a passed pawn on the a-file so white's king is tied down to stopping that threat. In the meantime, how does white stop black from marching into e4 and taking the e3 pawn?
The answer is a kind of breakthrough. If the black king ever comes to e4, white wins by playing b5! where black cannot stop a pawn from queening, e.g. cxb5 c6 or Kd5 b6. So now we realize that e4 is forever off limits to the black king due to this breakthrough. This means that in the diagrammed position white can play Kb2! and go take the a4 pawn without fear of losing since black can make no progress.
The question then is whether or not this will win or draw for white after
Kb2! Kd5 Ka3 Kc4 Kxa4 Kd5:
White to move

Now white's plan is to go after the a-pawn. Let's look at the direct route: Ka5 Kc4 and now if Ka6 Kxb4 is not good for white. Note that if the pawn is on a6 instead of a7, Kxa6 Kxb4 Kb6 wins for white. This means that black can never advance the a-pawn to a6. As a result, black will forever be doing a king shuffle on c4, d5, and e6. And, in order to stop white's plan, the king must move to c4 when white plays Ka5. Since he can only get there from d5, the black king can be triangulated.
Kb3! Ke6 Ka3! Kd5 Ka4 Kc4 Ka5 Kd5 Ka6 Kc4 Kxa7 Kxb4 Kb6 wins the b-pawn and leads to promotion.
Final caveat. When white has his king on a4, the pawn break doesn't work because after b5, cxb5+ is check. So if black plays Ke4 while the white king is on a4, white plays Ka5. Then Kxe3 is met by the breakthrough and Kd5 is met by Ka6.
Labels: booc, coffeehouse, diagrams, endgame, tactics
CT-Art 267
It seems every time I go through the problems of CT-Art I come across new issues with the problem set. Problem 267 is a good problem, but happens to have a second solution to the one given.
Black to Move

The CT-Art solution is
e2 gxf3 h1=Q+ Kxh1 exd1=Q+. Unfortunately I calculated the line
h1=Q+ Kxh1 e2 where the knight can't stop the promotion. Here crafy plays
Nf2 and black gets a queen vs. knight where it's easy to mop up the pawns and win. In fact, in the CT-Art line, white can throw in Nf2 and have essentially the same ending.
Maybe I'll play the "correct" line next time through.
Labels: CT-Art errors, diagrams, tactics
Level 40
I'm working through level 40 on CT-Art.
There are a lot of subtle problems on this level and some of them have alternate solutions. For example, problem 707. The diagram comes a few moves in:
White to move

The solution given is Rb8. The simple threat is c7, the rook on b8 allows Nxc7 to be met by Bxc7 simultaneously defending the b8 rook. Black can also try Nxd8 c7 Ne6 Rxe8 Nxc7 and white can easily pick up the a pawn to be ahead an exchange and a pawn.
A fine way to win, but white can also play c7 immediately from the diagram. CT-Art gives c7 a "?" due to the response Nxc7! (The "!" is their's as well). These are odd markings because Rxc7+ Ke6 (to trap the bishop) Bxg5 hxg5 Ra7 leaves white up three clear pawns in the endgame. Despite what people say about rook endings being drawn, I had no problem converting this against the built in crafy engine.
Labels: CT-Art errors, diagrams, tactics
CT-Art coming apart at the seams
Ok, I'll say it. The makers of CT-Art did not put in the necessary effort to make problems at the highest difficulty they intended. They have flat out failed to make the problems on the last level correct. I'm not just blowing gas here either, I'll give you two very concrete examples -- and I promise the last levels are riddled with this kind of thing.
First, a simple example. A position from problem
1178.
White to move
White has crashed through on the kingside and just needs to polish off the mate. The first thing that came to mind was f7. This threatens mate on g8 and forces Bg7 (other bishop moves allow Qxh6). Then white will play Ne4 planning Nf6 or Ng5 threatening Qh7 or getting the queen to the h-file (e.g. Nf6 Bxf6 Qxh6 or Ng5 hxg5 Qh5).
With those ideas, we think, what if white plays Ne4 first. Black does not seem to have any real productive moves. Certainly not any more productive than he would play after Ne4 in the previous line. If you're really keen you'll realize that the move order with Ne4 first leaves the f7 square open for the knight, e.g. Ne4 c5 Ng5 threatening Nf7 (if hxg5 Qh5 leads to mate quickly).
The CT-Art solution was f7, with no credit for Ne4. The best line for black after f7 is Bg7 Ne4 c5 (CT-Art gave Rd5 falling for mate in 2) Nf6 (or Ng5) Be4 Nxe4 (Notice f7 is unavailable for the knight!) e5. White is ahead 2 pawns and has a much safer king, but the move order with Ne4 first was clearly better.
Ok, that was the simple example. At least the solution given by CT-Art was actually winning. Problem 1177 was riddled with even worse errors. This takes some time to explain the multitude of errors, feel free to skip to the end of the rant.
Black to move

The first move,
Bxh3, is difficult to calculate all the consequences of, but it's easy to see the white king position will be exposed and there will be chances for black. White's response
gxh3 is forced.

Now CT-Art completely misses the win. Qxh3 threatening Nf3 mate. Be2 is forced. Black then has
Nd5 and after white moves the queen away,
Qa3 Ng4 Bxg4 Qxg4+ Kh1 is forced.

Black continues,
Nxe3 fxe3 (forced)
Qh3+ Kg1 Qg3+ Kh1 Rd5 Threatening mate.
 White has to block the rook from going to h5 using either the knight or rook on f5. This gives a piece back to black after Rf5 Rxf5 Nxf5 Qh3+ Kg1 Qxf5. This leaves black ahead to pawns and the white king remains exposed.
This line starting with Qxh3 is not the solution given. Instead, the program gives what is actually a move that does not lead to an advantage. After Bxh3 gxh3 from the starting position, CT-Art gives Rxd4 Bxd4 Nf3+ Kg2 Nf5.
Position A, White to move

And now a poor move is played by white to allow black to win. CT-Art doesn't even consider Rfd1 which allows white all the wiggle room he needs to stay alive. The program gives Be3 as the main line. This allows N5h4 Kh1 Qf5 and the threat of Qxh3 is too strong.
The program also gives two other lines from 'Position A'. First, Bf6 gxf6 Rh1

And now the baffling Re8. There is no commentary or further moves after Re8 except that they give it an '!'.
The second line from 'Position A' is Rg1 N5xd4 Bd3 (another questionable move from white) Nxg1 (Qe5 was much better) Qxd4 Nxh3 Rh1 Qd5+ Qxd5 Nf4+ Kf3 Nxd5. After all that, black has a two pawn advantage.
Labels: CT-Art errors, diagrams, tactics
Random positions
Not a whole lot to say lately. Just plugging along. Here are some positions from recent games:
White to play

This is from a blitz game. Here white is losing the b-pawn, so I decided to go for a swindle. Here were the next moves:
g4 Nxb3 g5 and black falls for it,
hxg5??White to play

Now white has a winning tactic. Rf3 threatening mate on h3 and the knight on b3. Phew, I got away with one there!
Here is an example of an un-developed queenside. White has made a bunch of queen moves and has now tried to lock the center with d5:
Black to play

But it turns out the rook on e1 is overworked. Black can break through with Nxe4. White didn't put up the toughest resistance. The game continued Rxe4 Qxc1 Kh2 Qxd2 Nbxd2 etc.
Lastly, an example of breaking open the center. Opening the center is generally better for the better developed side. That's a good rule of thumb for getting ideas, but you also have to calculate quite a bit because a lot of lines will be open.
White to play

White is a little more developed due to the rook on d1. More importantly, white's pieces are actually aimed at targets. The e3 bishop attacks the b6 knight and the d2 queen is lined up on d7 bishop while both of these pieces are defended by the queen. Also important is that the d1 rook is lined up on the queen.
So white opens it up with d5 exd5 Bxb6, the game continued with Qxb6. A better try, but still good for white would have been axb6 exd5 Be8 Qxc4. The game move loses quickly exd5 and now both bishops are under attack.
Lastly, an update on CT-Art progress. The last level is problems with difficulty 90 and above:
Level 90 and above: 74%, 22 problems done, 45 to go.
Ct-Art elo: 2587
1164 problems done, 45 left. Then, who knows, back to the beginning??
Labels: diagrams, progress report, swindle, tactics


